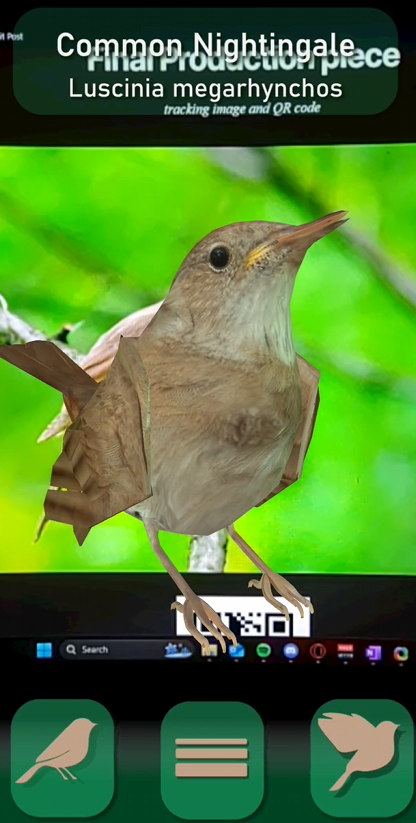
Emerging Technology Portfolio – Augmented Reality Educational Bird App Prototype
This proposal highlights the design and development process of my emerging technology production piece, the augmented reality educational bird app. My idea for this app was to make a educational experience inside AR which would act as a substitute for birdwatching, particularly for the less common species of birds which most people would not have the opportunity to watch in the real world. The app would display models of birds you could cycle through like an encyclopaedia as well as panels of information and facts about that specific specie. Due to the time constraints and my relative lack of experience I cut down the scope to a prototype of such an app, it would feature only one bird but otherwise be fully functional. My reason for trying to make such an app in AR has to do with the novelty of the medium as an example of emerging technology. Hopefully people will be more likely to try and experience the app if it stands out and differentiates itself to reading a book about a topic or watching a video.
Week 1
The development of my app began with structured research into multiple areas. I researched the development and use of augmented reality (AR) in applications and applications that are primarily based on the technology to gain a better understanding of how to develop my app as well as what features such an app would need.
As highlighted in my proposal for the app, I planned on having the bird as the centrepiece with UI elements surrounding but not obstructing it. These elements will be interactive and upon pressing them will expand into transparent pages with facts and information about the species of the bird. There will also be arrows on the side of the screen to switch between the animations of the bird and the bird itself will be a button which will play a sound upon being pressed.
At first I had planned on making the app inside Unity using the Zapworks plug-in, as I outlined in my proposal. However I have recently discovered Zapworks’ own AR designer, which I will consider using in addition to or instead of Unity as it seems to include many presets for features I want to include in my app such as the Interactive buttons and sound integration.
I also did research into different approaches I could take when modelling my bird. The final model would need to be ready to rig and animate. I had considered sculpting the bird in Zbrush however along with the retopology to make it animation-ready I think it would take too long to make something like that. If I have time later on I might try remaking the bird in Zbrush although I am not even sure if I could get a desirable result as I am not too confident with sculpting. I have decided to use a poly modelling approach instead.
For texturing I also considered multiple approaches. I could texture the bird fully in substance painter, use UV projection, paint my own Uvs in software such as Photoshop or I could texture paint in Blender. Whilst painting my own Uvs from scratch would have the potential to give me a nice stylized result, I think I would prefer to project textures onto the model for multiple reasons, first, hand painting textures could take a lot of time and second, I think I prefer the more realistic approach to texturing for the purpose of the educational app.
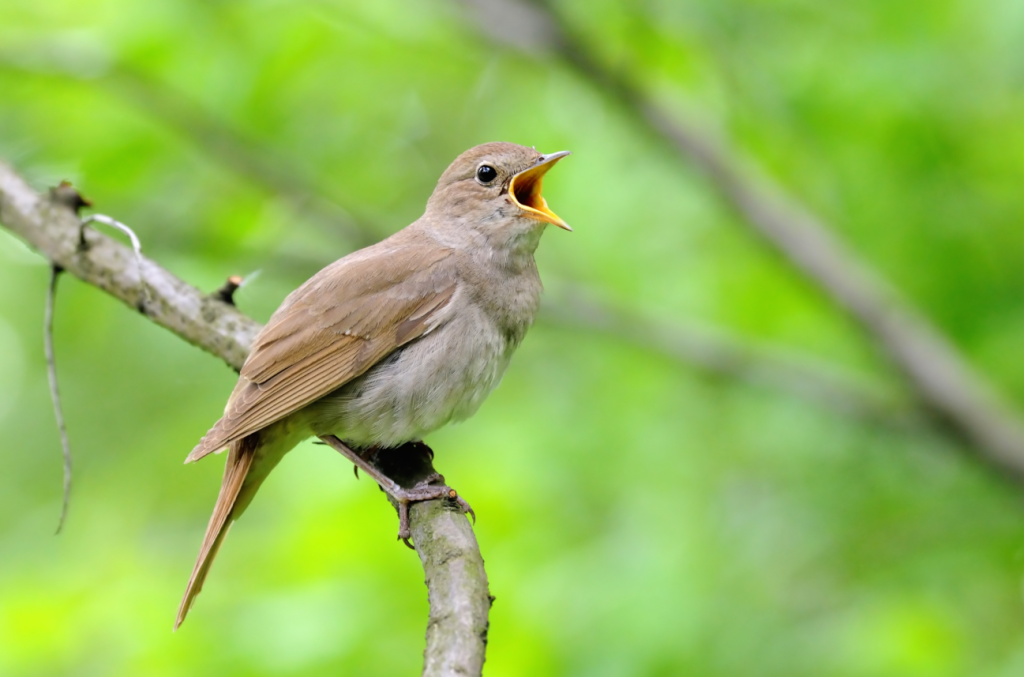
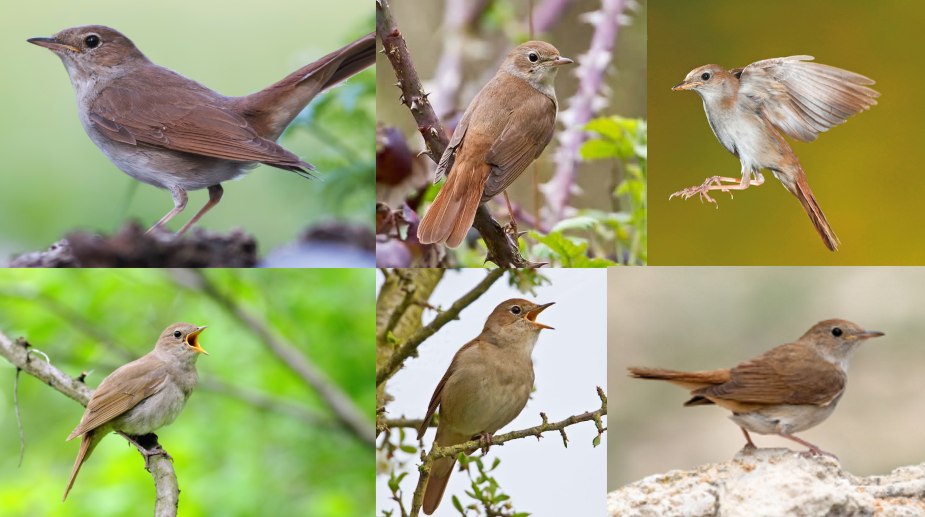
Gathering research for animation turned out to be a lot more time consuming than I initially imagined it might be. I struggled to find many suitable reference videos of Nightingales in particular, and finding animation reference for small birds in general also proved to be quite difficult.
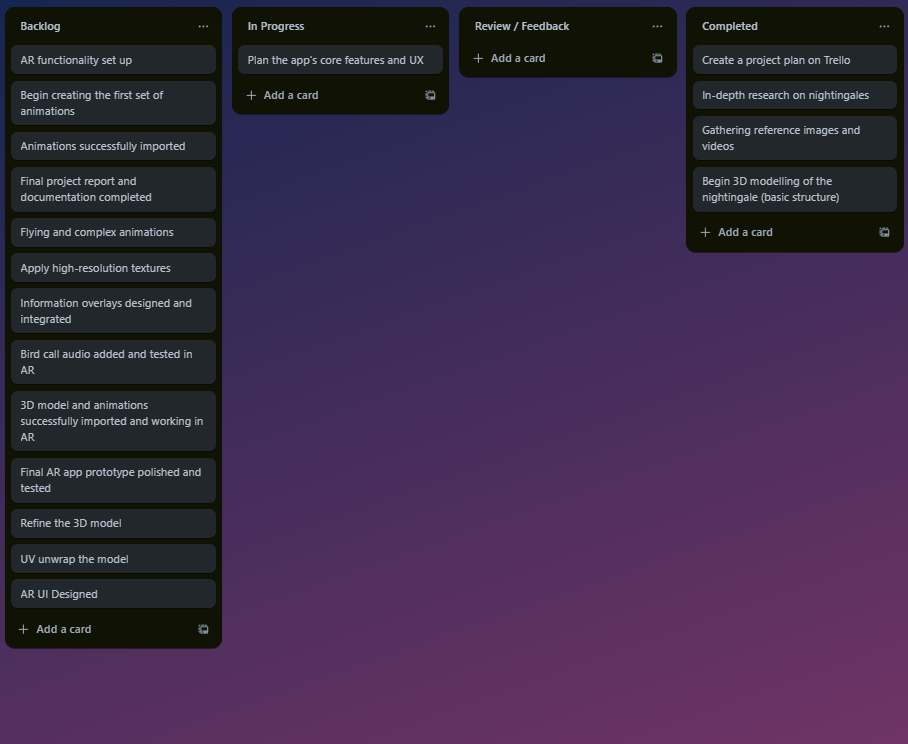
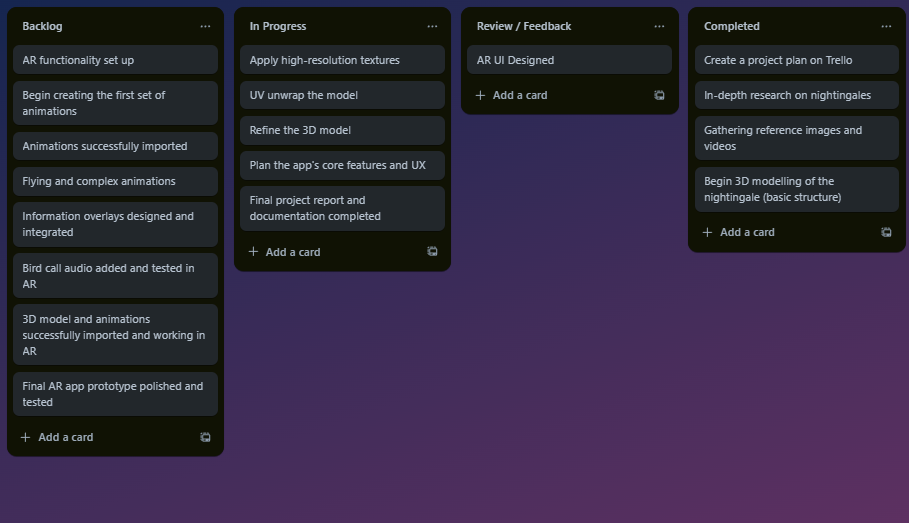
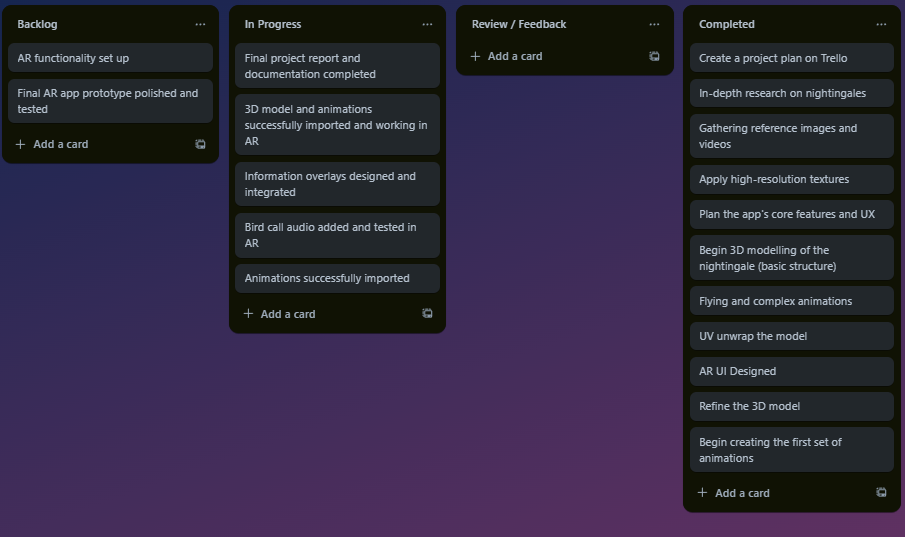
I will do my best to stick to the plan I laid out for myself in the proposal for this project as I believe working on the project in the order I outlined makes the most sense. The centrepiece of my app will be the bird, and so the modelling along with texturing and animating it so that it provides an immersive experience might take quite a while. For this reason I think its good to prioritise it so that I will have extra time to finish if I need it. I will also do my best to keep the Trello board updated and check it twice a week.
Week 2
This week I had planned to make a initial block-out of the bird model and finish gathering research and references for later. I decided I will use a poly-modelling approach to model my bird however I made a change in the software I was going to use. In my proposal and my plan I highlighted that the majority of the work was going to be done in Maya, however I was going home over Christmas and as such decided that it might be better for me to do the modelling in blender as I am a bit more familiar with the software and if any problems arose I could most likely troubleshoot them myself. Another reason for this was Blender’s texture painting feature, which I was considering using for my project and couldn’t find a suitable alternative for inside maya.
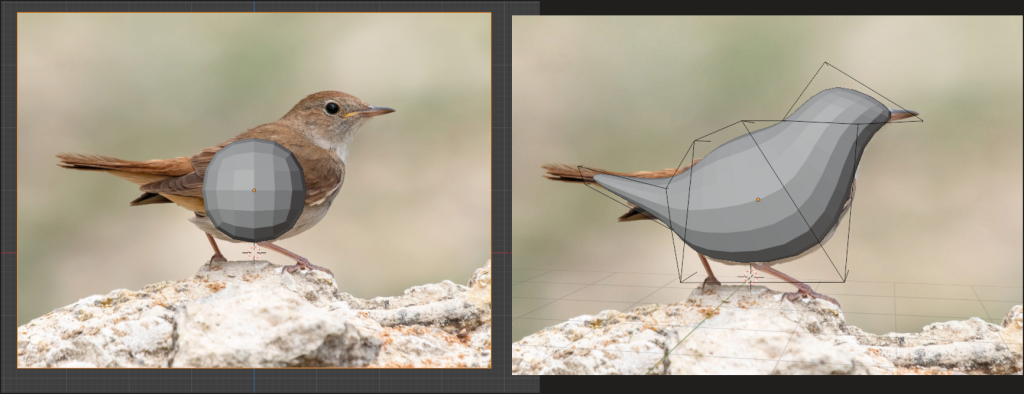
I began the by removing the default cube in blender, after which I added a cube to the scene with ‘Shift+A’. I also added a background image which I would use as reference for modelling the bird. I gave the cube a subdivision surface modifier in the modifiers tab and increased the viewport subdivision level. This modifier shows a preview of the subdivided object, meaning I could manipulate the simple geometry, moving the faces with ‘G’ and extruding them with ‘E’ to get close to the size and shape of my reference image. I applied the subdivision surface modifier. I could now delete half my model and use the mirror modifier to save on time for the modelling, this modifier would reflect my model along an axis of my choice which means I could focus on modelling only one half of my bird for now.
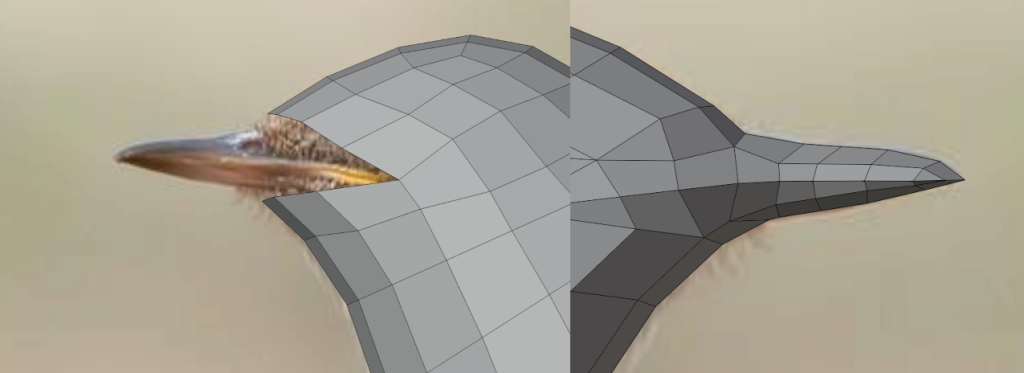
I selected the faces where the beak was meant to be and deleted them, after which I extruded edges and merged vertices with ‘M’ to form the general shape of the beak, I cleaned up the topology slightly by shifting vertices along edges by pressing ‘G’ twice and also used the knife tool to make sure I was not left with any 5-sided faces which could cause lighting issues.
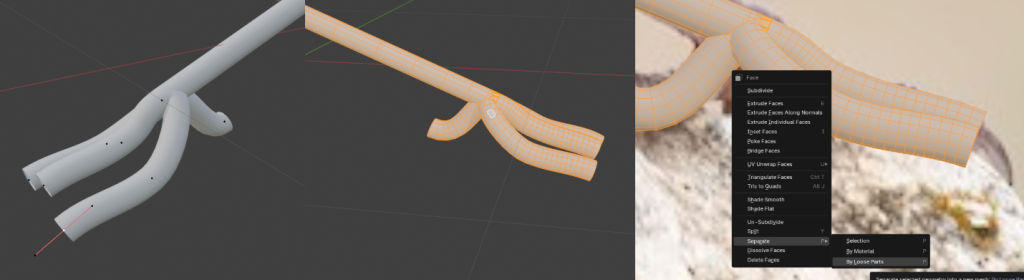
I added a bezier curve and modelled it to line up with the bird’s leg, I duplicated a vertice with ‘Shift + D’ but made sure not to move it, and then extruded it downwards and to the side to form a toe, I did the same thing for the other side and back of the foot. I converted the curve to a mesh so that I could work with the faces individually later.
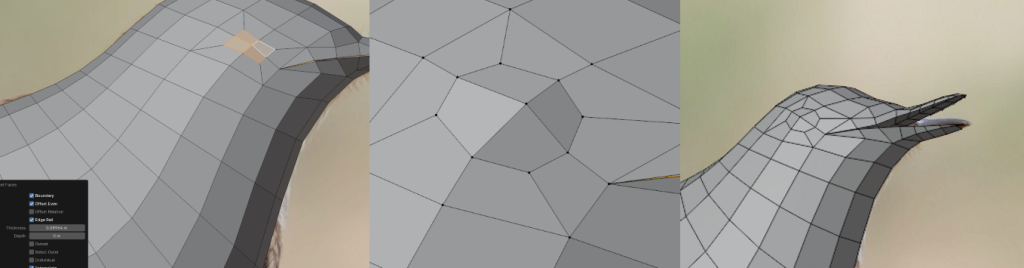
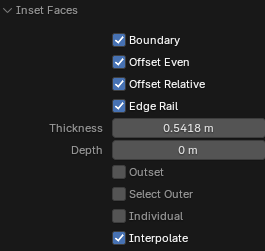
I selected faces around where the eye should be and inset them with ‘I’, I then slid the vertices along their edges to clean up the topology a bit, periodically checking to make sure I had the right shape by hiding the model with ‘H’ to reveal my reference image behind it. I aligned the new faces with the eye of the bird. I then split the beak down the middle by dissolving the edges, I had to make up the beak out of two separate parts as I planned on being able to animate it opening and closing. I inserted the roof and floor of the mouth by extruding some guide vertices, adjusting their position in line with the topology and then filling the faces with ‘F’. To make the eye, I extruded the four middle faces inwards, creating a hole in the surface of the shape, after that I inset the faces again and extruded them back out.

To refine the feet of the bird I first extruded some faces on the edge of the toe, I then extruded them outwards and down in the side view in order to create the claw-like shape you can see in the picture. I also scaled down the tips of the toes by hitting ‘O’ to enable proportional editing, which makes functions affects a diminishing area around the selected topology. I used this to create a more believable and tapered shape for the toes on the foot. I cleaned up the topology on the nails by sliding the vertices along edges and trying my best to maintain a consistent face size across my model. This whole leg was then duplicated and positioned on the mirrored side of my model.
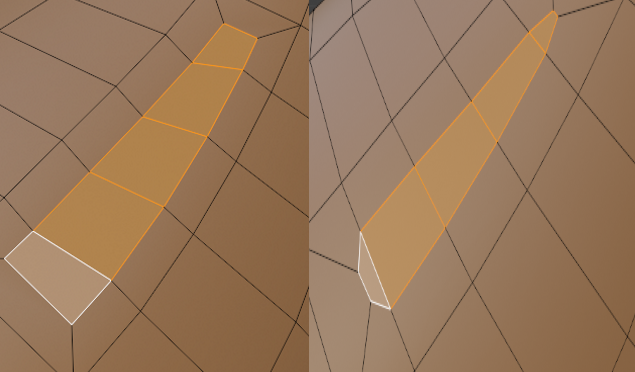
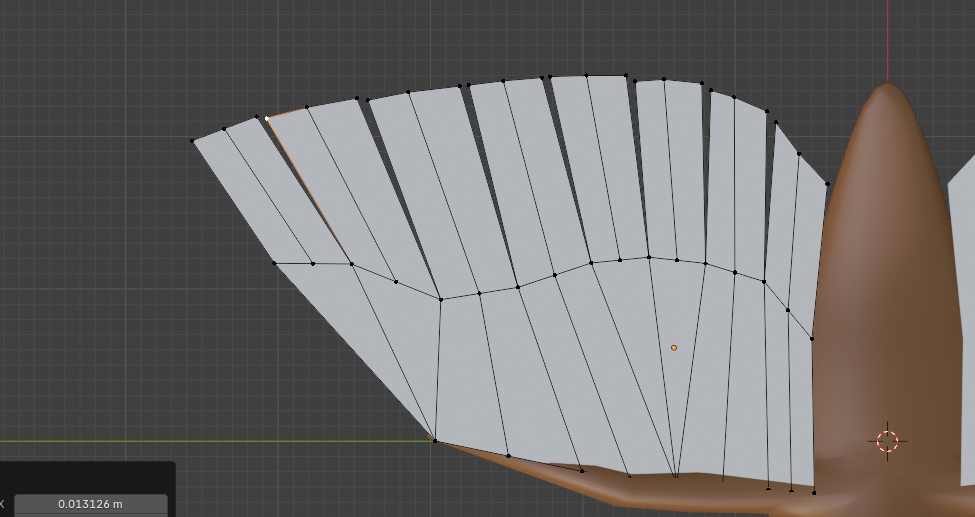
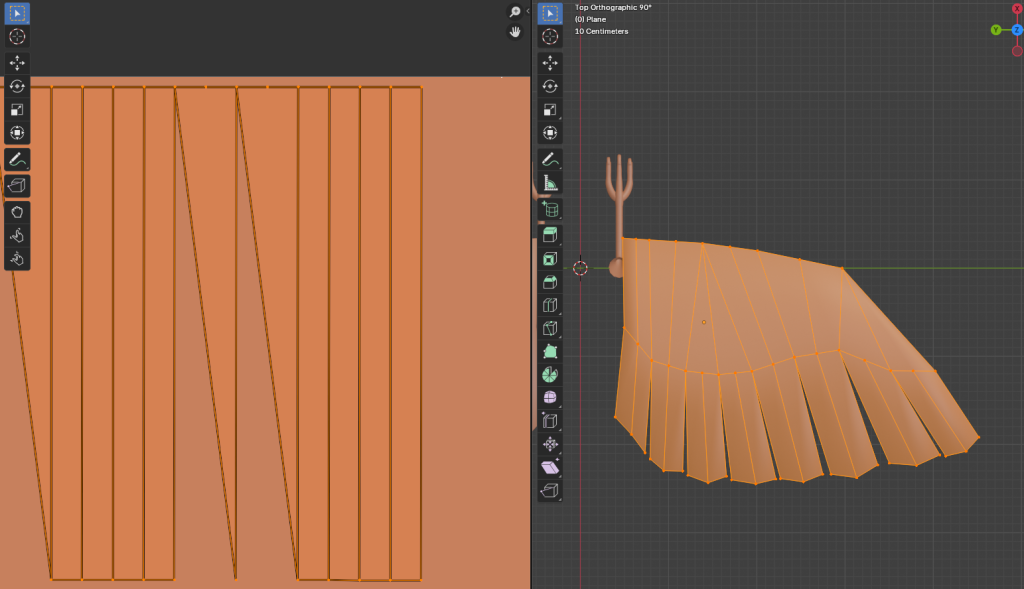
I selected a few faces and inset them to create faces I could extrude my wing shape out of, however this time I left the extrusion tool open and adjusted some of the settings so that I would be left with a better edge-flow and more manageable topology. I then extruded this new shape from the body and proportionally scaled it whilst rotating it into the right shape.

I made the wings out of a plane which I positioned at the right place on the torso of the bird and subdivided to give me some edges to work with. I adjusted the shape to closer resemble a wing and cut more shapes with the knife tool to build up a bit of a cleaner foundation. I then extruded the edges outward, I split the vertices along the end to form groups of two faces which would act as the feathers, I moved them around slightly to fix and adjust the shape.
Week 3
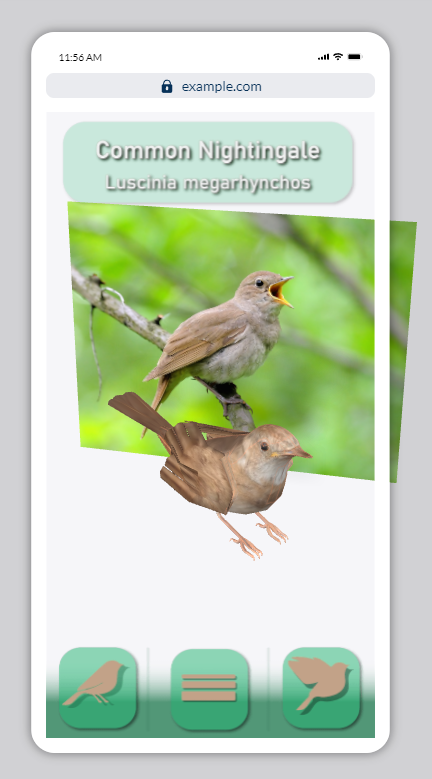
I began designing the UI elements for the app, I had a general Idea of what I wanted but I had not specifically planned out the exact layout of the elements. I knew I wanted buttons to cycle between the Idle and flying animation of the bird, as well as a screen element to display the common and species name of the bird. With the layout of the elements I had to make sure, as the primary focus of the app was the bird, that the UI elements would not obscure the centre of the screen.
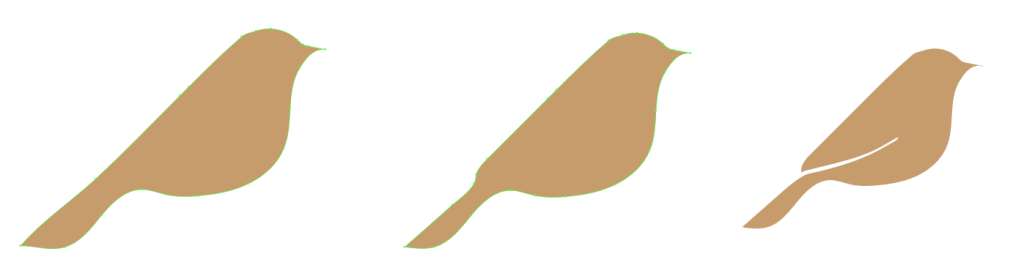
Rather than using adobe photoshop I figured that illustrator might be a better option for me as the designs I was trying to create were not overly complicated or detailed and I felt like illustrator could give me some cleaner results. I started by marking out a vague bird silhouette with the pen tool. This was going to be the base for my bird icon that I would use for the flying and resting buttons. I erased part of the tail to separate it from the rest of the body and also erased part of the body to give the wings their shape.

I reused the base of the icon and drew on another shape for the spread wings of the bird. I wanted to keep the UI elements simple so I felt like this was enough for both of the buttons, I started designing the rest of the UI, including a button to bring up the information screen, as well as the bird name card. I added a drop shadow to the elements and put them on squares with rounded corners to make up the buttons themselves.

I ended up with something that looked like this. A very important thing I had to consider when designing the UI was the user experience of my app. As I mentioned before I wanted the majority of the screen to remain unobscured so I kept elements off of the middle of the screen. I did this primarily because I wanted the bird, the centrepiece, to remain visible and unobscured however I also had to keep in mind how people would navigate my app. I imagined that most people would be viewing this on the phone, so I arranged the elements with that in mind, keeping the interactive elements on the bottom of the screen so that the user could comfortably reach them with their thumb without having to move their hand.
Week 4
For the most part the topology on the bird was simple enough to where I could get away with using the automatic UV unwrapping. There was an area or two however, like the torso of the bird, where I had to mark some seams to avoid overlaps in the Uvs.
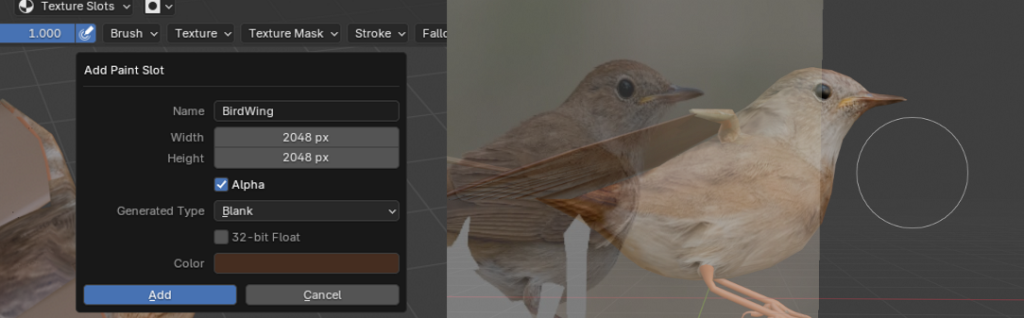
The majority of this week was spent on texturing the bird, my main approach to texturing was first applying a base colour material, this was done so that I could texture paint on the Uvs of my model. I ensured that the base texture was a high enough resolution that my model would look of decently high quality when viewed through the phone screen. I used blender’s texture painting feature, and specifically the stencil masking feature to be able to take textures and images and paint them directly onto my model.
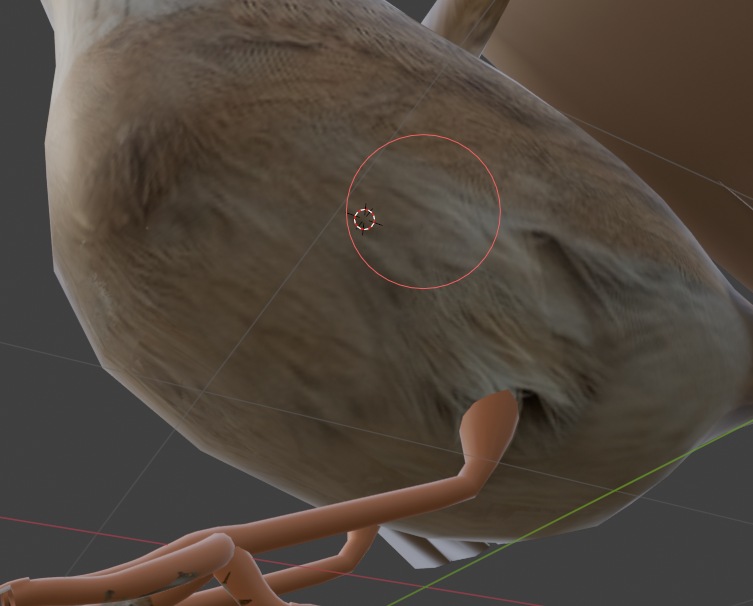
Aside from the stencil mapping I also used the clone brush to fix rougher areas, this brush works by taking the textures from areas around the 3d cursor, which you can move by Ctrl clicking over the model, and then drawing those textures on other parts of the model. This was really useful as there was always areas not fully visible on the references and textures. The torso under the wing, for instance, was a part that I had to texture myself as I did not have any references showing that part of the bird.
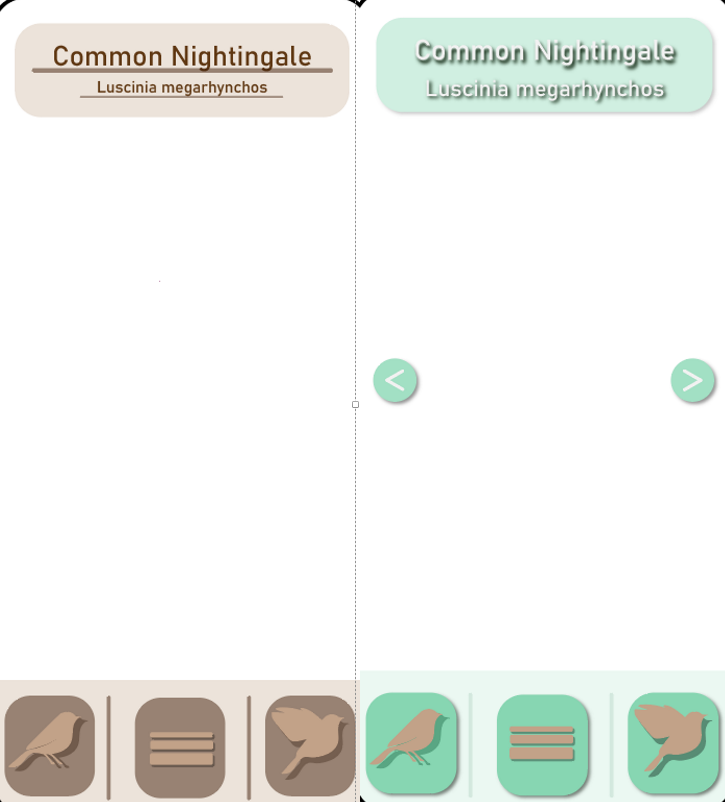
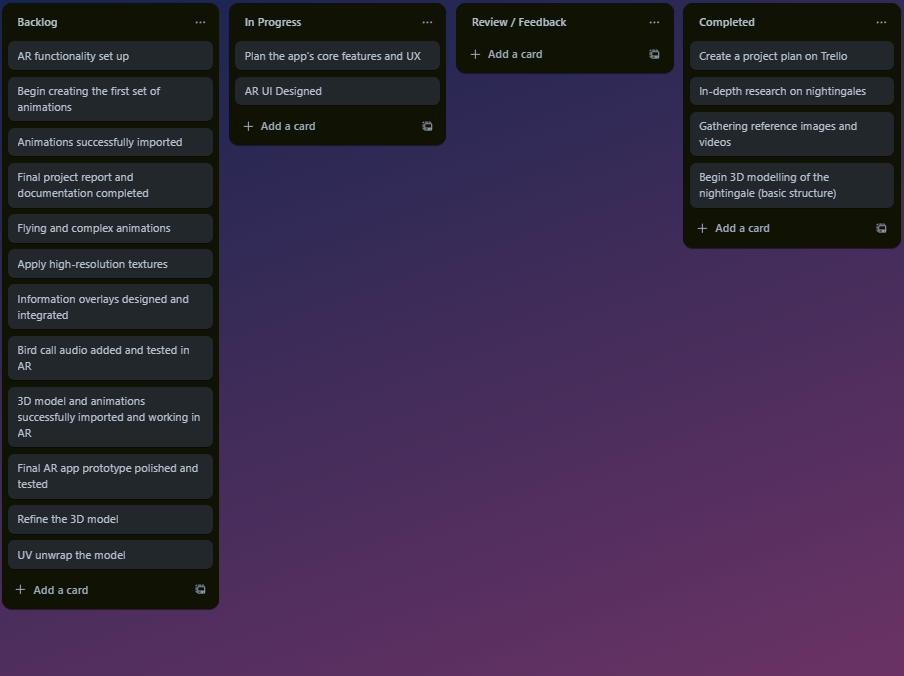
Based on some feedback I received from friends I adjusted the UI elements that I had designed the previous week. The most common piece of feedback I got was to do with the colour scheme, I was told that It being monotone made it look rather bland and almost sad. In addition to that they suggested I remove the gradient from the buttons as it added unnecessary detail and cluttered the view.
Week 5 & 6
This week I wanted to start animating the bird. My goal, in order to create an immersive AR experience, was to create at least two separate animations. I wanted an idle animation state that the bird would be in as soon as you loaded into the app, as well as a flying animation that would play upon hitting the button. Before I could start on any animations, I needed to create a rig for my bird, this would ensure i could move ‘bones’ about which in turn would have an influence on the surrounding geometry. This influence that the bones have can then be adjusted during the weight painting process. Once the rigging and weight painting is complete, then the animating process can begin.
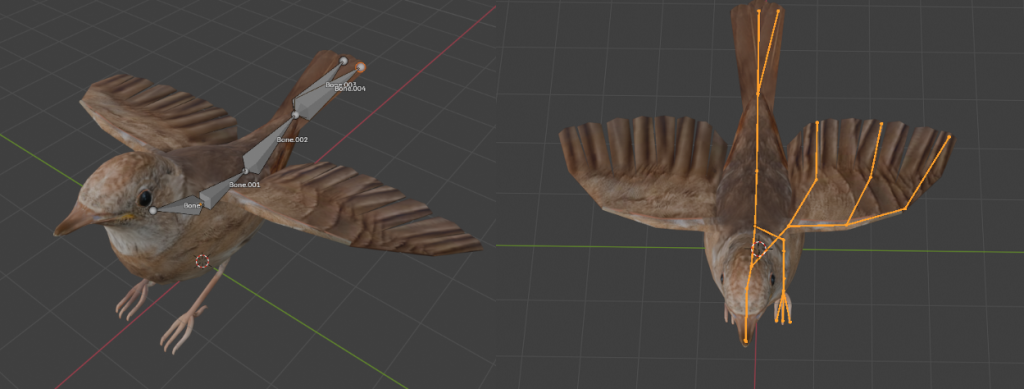
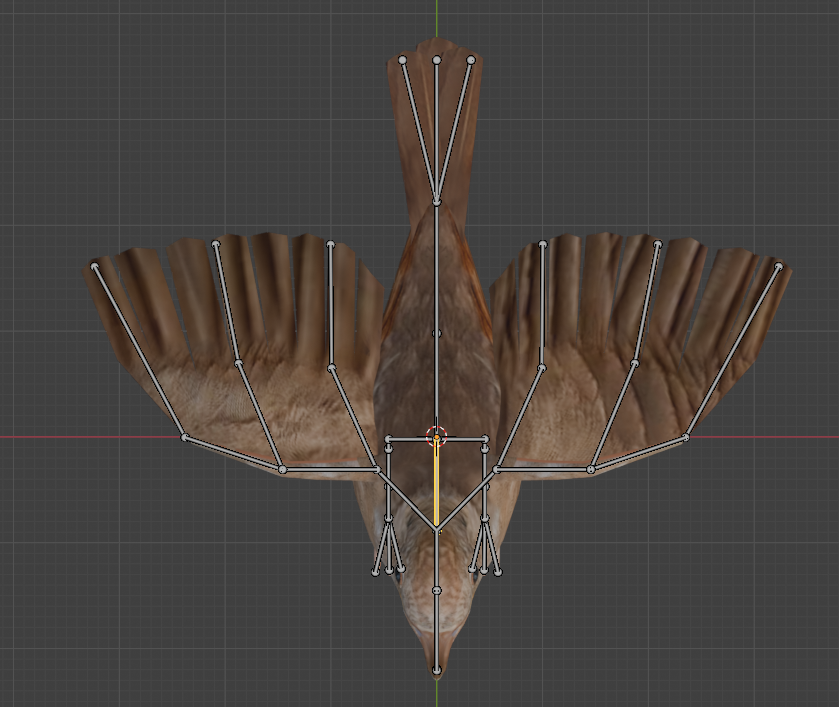
I started by adding a bone to my scene and extruding it along the shape of the bird’s body, I branched off the bones on the tail feathers so I would have individual control of them, similarly I branched two separate bones off of the head to give me control of both parts of the beak and finally I added the rest of the skeleton, following along a rough shape of where the actual bones of the birds would be as well as places where I’d need the mesh to deform. I focused on only one half of the model for now as I could reflect the bones to the other side of the mesh. To do this however I needed to add a naming convention that the software would recognize. This was simple enough as I just had to select all my bones, which I had already given hierarchal names to, and hit ‘Ctrl + F2’ this brings up the batch rename menu in which I could add a suffix to all of the bones. Since my bones were on the left side of the bird I added a ‘.L’ to the bone names. I then symmetrized the bones from the right click menu.
Now that I had the simple rig ready I could begin weight painting, if I tried to animate now the model would deform weirdly as the software assigned automatic weights, for the most part they were okay but needed a bit of refining. In Blender Influence is visualized through a change in colour, from dark blue (no influence) to red (full influence) the process of weight painting is assigning values between those two, which helps the program determine what geometry should be affected by the bones. To enter weight painting mode you have to select the armature as well as the object you wish to paint on. Then, in object mode, you hit ‘Ctrl+Tab’ which brings up a radial menu and the weight painting mode can be selected, this will then let you ‘Alt click’ the different bones to see their influence after which you can adjust it by just drawing over the vertices with values between 0 and 1.
Now that the model had an armature to control as well as weights painted I could begin animating, however I still wanted to prepare my viewport layout in order to make the animating workflow as efficient as possible
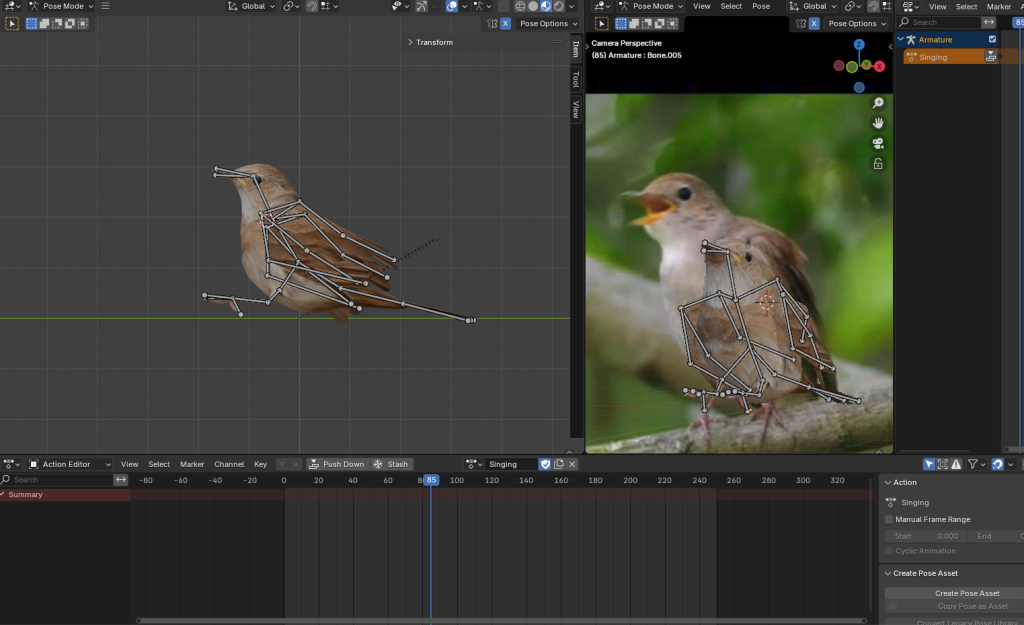
After switching to the animation tab I dragged out a separate viewing window, in one of these views I locked the perspective to that of the reference and would keep it like this for the entire time I would be animating that particular sequence. I also switched from the dope sheet at the bottom of the screen to the Action editor, once I got the basic poses keyframed in I would switch back however the action editor lets you create different non linear animations on the same model. Finally, to view these animations I opened the non linear animation menu on the right.
I followed a pose to pose approach at first since I could stop at any given frame on the video’s timeline and match my model to the reference, after this I began refining the movements to make them look more natural, this was done mostly by controlling the timing and motion. If I left the poses as is, the software would interpolate between them creating smooth transitions however that does not always look natural. Birds have quite fast, snappy movements so I would need to make sure that is reflected well enough in my animation to keep up the immersion. Aside from controlling the timing, another useful animation technique is the use of overlapping actions, in my case I tried to animate the body, wings, beak and legs of the bird on different levels, so that it looks more natural.
Week 6
As I mentioned before, there was not many suitable animation references I could find, this meant that for things like the flying animation, I had to base it off of general bird and other animation references.
One issue I ran into was that the wing speed was too slow when animating at 24 fps, I would lose a lot of visual clarity in the animation if I made the wings flap as fast as they should, however I still wanted to reach at least a believable speed so I animated a full cycle and then scaled the keyframes down over a shorter timeframe.
I ended up creating 3 separate animations. I created the flying and idle animations like I planned but I also animated the bird singing which I could also use in my app as I already planned to include an audio sample of the nightingale’s song. I had a sample which I downloaded earlier off of Freesound.org and denoised it inside Adobe Audition, I did this by uploading the sample, selecting a bit of the track where the bird was not singing and selecting ‘Noise Reduction Restoration > Capture Noise Print’ from the ‘Effects’ drop down menu after which I hit ‘Noise Reduction’ and ‘Apply’. The sample was then trimmed and ready to be used in my app.
Week 7
Next came importing all of my assets into the Zapworks Designer. Building the experience itself was rather simple as I uploaded my assets and began arranging them inside the 3D space, I chose a vertical image tracking type and uploaded the tracking image. I then uploaded the 3D bird model and checked to see if all the animations were present, I had to export the model as a ‘gltf’ extension for it to appear in the designer, all the animations were present and I could select which state the bird would be in by default and then call a change in animation state from other sources in my scene.
I anchored all of the UI as screen elements, meaning their position would not be tracked and instead they would appear on the screen, I felt like this was better than having them move about as I feared that loose elements would be harder to read and interact with, and might even cause eye strain for some people.
I linked the buttons to the object and set the animations to play when the corresponding button is pressed, In addition I also gave the 3D model itself an ‘on-tap’ function to play the singing animation and play the song sample.
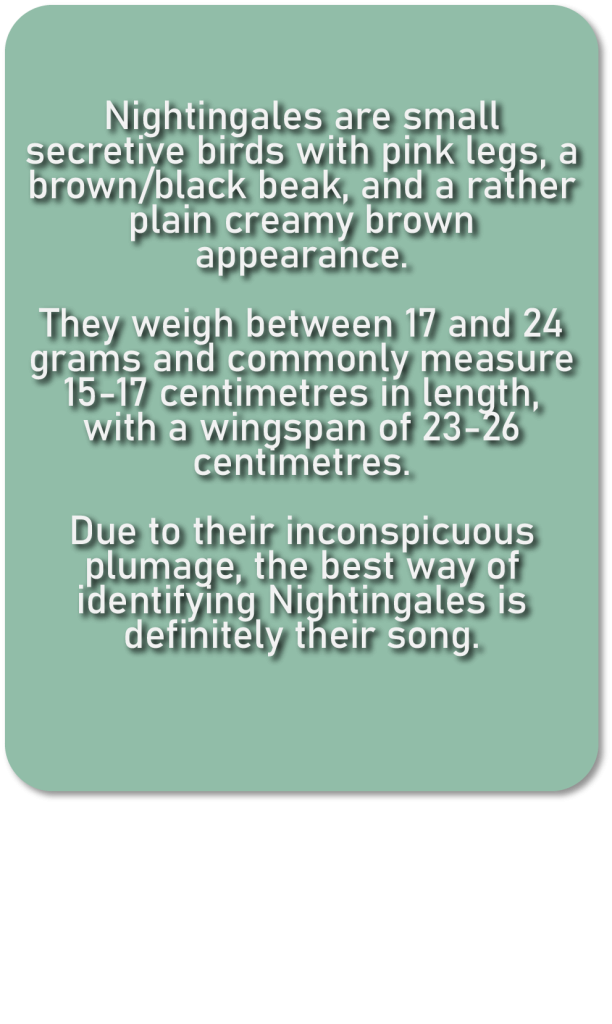
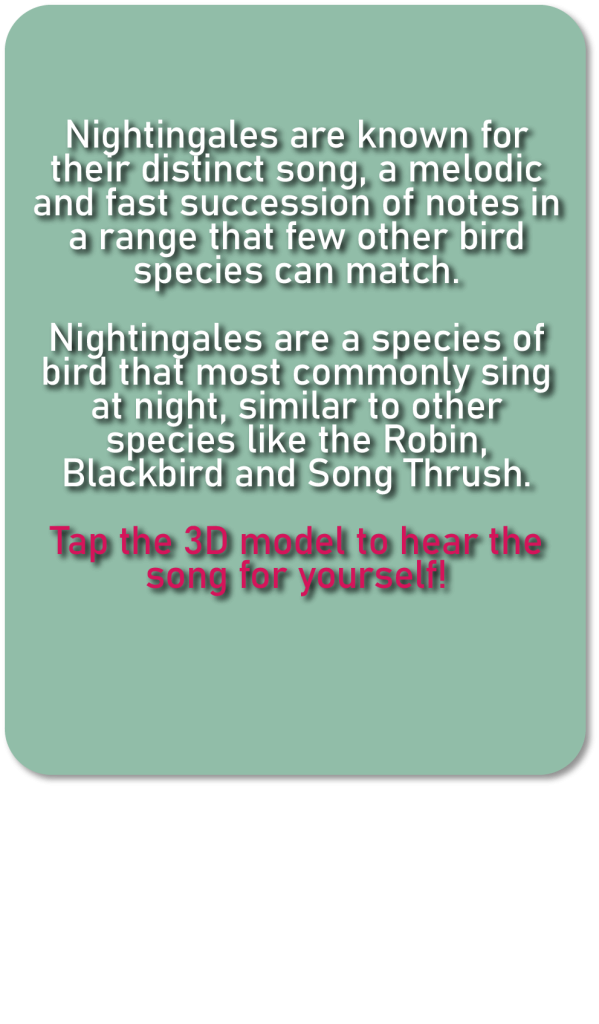

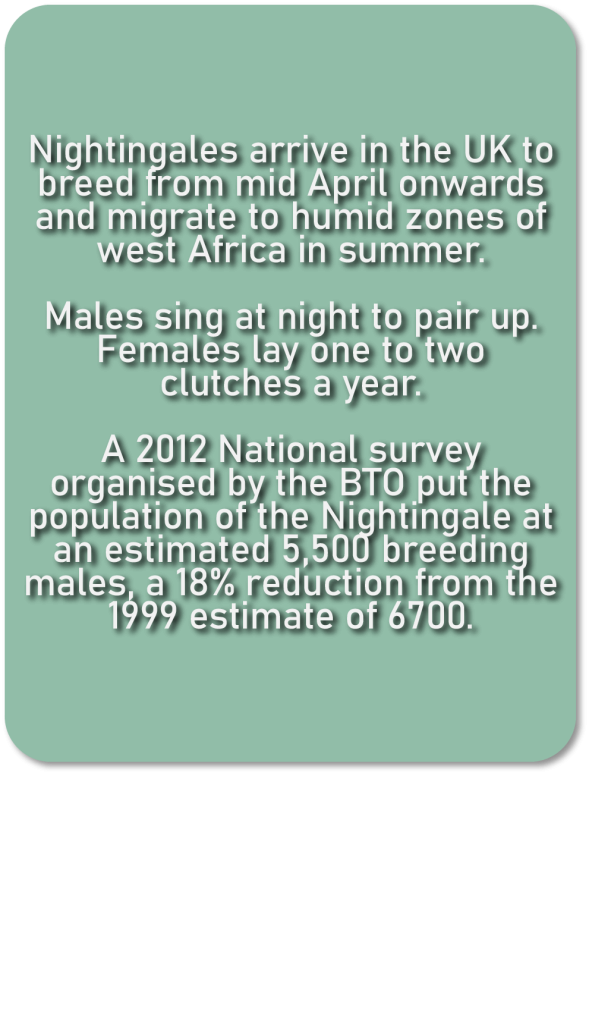
I put together some panels with the information I’d like to include in my app and imported them into my project in the designer. I put together the information on the panels according to multiple sources such as the Royal Society for the Protection of Birds (RSPB) and the British Trust for Ornithology (BTO). I wanted to bring attention to the endangered conservation status that the specie of bird has in the UK so I included slides about the conservation and population of the species. You cannot animate screen elements in the software so to get around that limitation I thought I’d make the different panels occupy different scenes, and the buttons would just take you between those scenes rather than switching the information.
Week 8
I tested the final build of the app myself and also sent out the QR code and tracking image to a few friends to make sure everything in the app worked.
Final Production piece
tracking image and QR code

un-narrated video showcase
narrated video showcase
Image And Video References Used
References
Tomlinson, D (2021) Why are nightingales disappearing from the British countryside? https://www.thefield.co.uk/country-house/why-are-nightingales-disappearing-from-the-british-countryside-45570 [Accessed: 21/11/24]
Peacock, G (2010) Nightingale https://cambsbirdclub.blogspot.com/2010/04/nightingale_26.html [Accessed: 22/11/24]
Ogün Aydin (2022) https://birdsoftheworld.org/bow/species/comnig1/cur/introduction [Accessed: 22/11/24]
reinsamba (2006) nightingale song 5 https://freesound.org/people/reinsamba/sounds/14854/ [Accessed: 29/11/24]
Wildlife World (2026) Singing NIGHTINGALE – the best BIRD SONG [Video] https://www.youtube.com/watch?v=XdlIbNrki5o [Accessed: 04/12/24]
Stranger (2021) BIRD ANIMATION / MAYA / TUTORIAL https://www.youtube.com/watch?v=mvSec7bou18 [Accessed: 21/11/24]
Grant Abbitt (Gabbitt) (2022) Texture Painting – Quick Start Guide – Blender [Video] https://www.youtube.com/watch?v=WjS_zNQNVlw [Accessed: 11/12/24]
Just Make Animation (2020) Birds Take Flight – video reference for animators [Video] https://www.youtube.com/watch?v=CJHP6dPjuGY&list=PLbfW76JfqFLl50w9tGLtDgOO0KfdLPGmB&index=4 [Accessed: 21/11/24]
AlexanderLiebermann (2021) Common Nightingale: Song in Sheet Music [Video] https://www.youtube.com/shorts/R6TLe3xIYKY [Accessed: 06/12/24]
SmarterEveryDay (2013) How Bird Wings Work (Compared to Airplane Wings) – Smarter Every Day 62 [Video] https://www.youtube.com/watch?v=4jKokxPRtck&list=PLbfW76JfqFLl50w9tGLtDgOO0KfdLPGmB&index=3 [Accessed: 21/11/24]
Zappar (2023) Using 3D creatively in ZapWorks Designer [Video] https://www.youtube.com/watch?app=desktop&v=gtCjrnNk6X4&t=142s [Accessed: 13/01/25]
Miloš Černý Animation (2020) How To Do A Bird Rig With Foldable Wings – 3ds Max CAT Rigging Tutorial (Part 1/2) [Video] https://www.youtube.com/watch?v=qsgDjktVaLU [Accessed: 27/11/24]
British Trust for Ornithology, BTO (1932) Understanding birds British Trust for Ornithology https://www.bto.org/understanding-birds/birdfacts/nightingale
The Royal Society for the Protection of Birds, RSPB (1889) Birds and wildlife The Royal Society for the Protection of Birds https://www.rspb.org.uk/birds-and-wildlife/nightingale
Luis Talamantes (2023) Ar for everyone UX Collective https://uxdesign.cc/ar-for-everyone-how-to-build-accessible-augmented-reality-experiences-d6248b1a371a
Software Used
Adobe (1987) Illustrator https://www.adobe.com/uk/products/illustrator.html [Software]
Adobe (2003) Audition https://www.adobe.com/uk/products/audition.html [Software]
Atlassian (2017) Trello https://trello.com [Software]
Blender Foundation, community (1998) Blender https://www.blender.org [Software]
Freesound Team (2005) Freesound https://freesound.org [Software]
Zappar ltd. (2011) ZapWorks https://zap.works/ [Software]